Friday, June 29, 2012

Fun Creating My Own "Washi" Tape

Washi tape is all the craft rage these days, and well it should be! It is fun stuff, with lots of applications (pun intended), and comes in a huge variety of colors and designs. I have been collecting washi tape, and my good friend Ami gave me a bag load for my birthday (she took me shopping and let me choose--an awesome present!),  And of course I have been collecting decorative tape over the years--Tim Holtz has a lot of different styles, and I think I have managed to acquire them all! And there are other brands, like 7Gypsies and Cavallini, and others I can't remember off-hand. Tons of colors and styles, and lots of fun to use.

But sometimes, three hundred and eleventy-seven rolls of tape Just Aren't Enough--and then you have to make your own. You can use any kind of tape and stamp and color on it, of course. Masking tape works well, and there are cloth tapes you can get for book binding and also for sports uses (like taping a baseball bat handle or a hockey stick). None of these, however, have the soft translucence of tape like Tim's or the traditional washi. So, can you get that effect? Yes, you can!


I discovered that Scotch Magic Tape, the removable kind in the blue plaid box, takes stamping well, and has the same soft translucent look to it that the washi has. The example above was stamped randomly with Ranger Archival Jet Black ink, and then colored with Ranger Distress inks. The Distress ink was put on directly with the pad, spritzed, allowed to dry for a minute or two, and then wiped down with a paper towel.

Another way to get that desired translucent effect uses parchment paper--the kind you cook with--as the base. I use strips about six inches by twelve inches. Again, I stamped random images in Ranger Archival black ink and also stamped some with Distress inks. I applied Distress ink directly from the pad, also, and wiped it down with a paper towel. I heat set the inks on the parchment paper, which I couldn't do on the Scotch Tape because it would shrivel.


Next, I turned the stamped paper image side down and applied Sookwang tape (packaged as Scor-Tape) to the back. I used various widths of the Sookwang tape, and burnished it down well.


When I had my parchment paper completely covered with the tape, I cut the strips apart.


When I finished doing that, I had strips of decorated tape, complete with liner, ready and waiting to go on a project! So easy!


You can also use deli paper to do the stamping on. It is thinner than the parchment, and therefore not as sturdy (before the tape is applied), but it makes great washi.. You can also get a more subtle effect by applying the tape to the stamped side. Tissue paper can also be used--either plain with your own stamping on it, or already decorated.


You can store the finished parchment paper tape in a plastic bag, and the Scotch Tape kind can be stuck to some kind of release paper and sored in a baggie as well. Or you can stick those to a page protector, and put the parchment ones inside.


This closeup has Scotch Removable Tape washi tape on the outside, and parchment paper washi tape in the middle.


Next I am thinking of trying to print on deli or parchment paper (or both) and making washi tape out of that. I'll let you know how that goes!

Until next time, Nan

Wednesday, June 20, 2012

What possesses folks to use yellow?

I've just got to vent! I've just spent an hour blog hopping at Graphic 45 and their week with May Arts ribbon. (here's the link: http://g45papers.typepad.com/graphic45/2012/06/graphic-45-may-arts-blog-hop-day-3.html?utm_source=feedburner&utm_medium=feed&utm_campaign=Feed%3A+g45papers+%28Graphic+45%C2%AE%29 ) I am getting inspired by the terrifically talented designers. They have great ideas, and they share these most generously and with good instructions. BUT (you knew that was coming, right?) some of them use yellow to type links and/or vital information, rendering said links and information unreadable. Yellow against white? About as little contrast as you can get! See what I mean? Isn't this better?

As long as I'm here, I might mention that, although one is encouraged to leave comments (there are swell prizes), on some of the blogs, finding the place to do this is really difficult and sometimes impossible. I've had thee days' experience with this now, and been frustrated at least four times when trying to comment. I like prizes, sure, but I also like to tell folks when I find their projects useful and ornamental, and it frustrates me when I can't do it. Now, this may be the fault of the blog host, but maybe a word from a client might fix it.


I've spent the last three days taking an awesome internet class on Photoshop from Jessica Sprague at http://www.jessicasprague.com . Although geared to scrapbooking, the class has lot to offer those of us who do digital art, and I am glad I signed up for it  Here are my class assignment results.


Day one homework: Top to bottom: Black and white version of "Best of Friends"; color version with grunge texture layer;  color without grunge layer.

Day two homework: Scrapbook page with journal text


Day three homework: Manipulating photo with textures and masks; using clipping masks

Sunday, June 3, 2012

Things My Grandmother Taught me

Well, it's been a while, hasn't it? A bout of pneumonia (brought on by allergies) and preparing for classes at Letters of Joy and Bellevue Art & Frame, and Clay Camp with the Northwest Polymer Guild kinda took up my time, and I have some catching up to do!

The grandmother of the title is, of course, Bam Bam. I know I've mentioned that I lived with Aunt Quail and Bam Bam several times while I was growing up, including my last semester of High School. So I had many opportunities to observe--and collect, if only in my memory--her wit and charm, and her wisdom.

She was fond of quoting aphorisms, lines of poetry and plays, and of making her own observations. There were three she repeated often; one was a quote from Shakepeare's King Lear, one was her own creation, and one was an old Chinese proverb.

"How sharper than a serpent's tooth it is to have a thankless child," King Lear says of his daughter Cordelia, who is the only one of his three daughters who loves him and wants him to live long and prosper. Bam Bam quoted this at me whenever she felt I was not toeing whatever line she had in mind. Often I hadn't a clue what line was not being toed. And when I did have a clue, half the time I had no idea why that particular line needed toeing. But that was Bam Bam: an enigma wrapped in a mystery wrapped in whatever aspect of her fascinating self she chose to reveal.

"T'was greed killed the yellow snake that tried to eat the sun," Bam Bam would say, whenever she felt someone was trying to take too much of what she considered our common heritage, be it money, political clout, or property. The Chinese proverb appeared in a footnote of a book I was reading--I don't remember the book now--which I had found in the bookcase. She had apparently read the same book.

"Fear is the enemy," she would tell me, inclining her head wisely. She was writing a book about John Wesley at the time. He was the founder of Methodism. I don't know why she was writing about him, or what happened to her manuscript. It may be among her papers in the Bancroft Library at the University of California. Anyhow, Bam Bam went on to tell me that most of the baser emotions like hate, anger, and bigotry are founded in fear, and if one could be rid of fear, things would be a lot better. She was thinking of using "Fear is the Enemy" as the title of her book. I have always remembered her telling me that, and the older I get, the more obvious it becomes. In the words of FDR, "We have nothing to fear but fear itself."

A year or two ago I was looking through a bookcase in the downstairs "library" and came across The New English Bible New Testament published by Oxford Cambridge. I was going to refile it next to the Septuagint, thinking they might be related, and flipped it open. Inside the cover was the pencilled inscription in Bam Bam's unmistakeable handwriting, "From Anthea 1965." Further investigation revealed the book to be a "dummy," a book made to test the size and binding of the finished book, but with limited text. This dummy included everything up to the first page of the introduction, and after that the pages were blank. Bam Bam used these pages as a sort of journal of wit and wisdom, writing, beginning in 1966, some of her more observant thoughts.

"Boredom is ingratitude to God."
"All mental disturbance is caused by concentration on Self."
"Craziness is selfishness to the N-th power."
"Only the childless truly value children."
"Only the pure know passion."
"Alcohol before 60 is not needed. Afterwards it is a new life,"

Bam Bam was very moral, and a devout Episcopalian. She made some notes at the very back of the book, observations about Jesus, which she titled "Human attributes of Christ." They seem to be the distillation of much thought on the subject.

"Need of friends
'Sought after dinner guest.'
The bitter psychology of forgiving enemies, thereby disarming them of their implements of destruction and rendering them powerless to possess you.
Lilies--Love of beauty
need of necessities of life for all classes. Loaves and fishes.
appreciation of craftsmanship and quality. 'Casting lots for his garment'
Anger for righteousness--money lenders in temple"

There is also a poetic discussion of Yeats, apparently copied into the book from something she wrote in 1962; more aphorisms; and  the beginning of what appears to be a screen play pitch. And two essays on her meanness--about her behavior on two occasions, things  she felt guilty about her whole life. Some of the items were written when she first had the book, but there is an entry dated 1990. And there is no clue of the date of the last entry.

Until next time--Nan


Monday, April 30, 2012

I Confess! It's True!

I have Paper Lust. I admit it. I can't help it, and no 12-step program will cure it, I'm afraid. Not that I would ever try.

So,  you can just imagine the elation I felt when my friend Brooke, who owns The Urban Scrapbooker in Edmonds, asked me to be on her Creative Team. I mean, she has the BEST paper! Not to mention all the other good stuff!

So when I said yes, Brooke handed me a couple of projects to get started on. In spite of allergies that turned into pneumonia, I managed to finish one project, A Graphic 45 film box and book. We decided that the Graphic 45 Tropical Travelogue line would be the paper to choose, with suitable embellishments, of course.

You can see the Graphic 45 line here: http://www.g45papers.com/

I started out by gluing a circle of paper to the top and bottom of the film box, using Golden Soft Get as the glue. I fastened a large knobby brad to the center of the top circle before sticking it down. For the bottom, I used four of the smaller knobby brads as feet. I had to think about how I was going to attach them; I could have used a chisel and made a slot, but then I would have had filing and sanding to do. So in the end I clipped the legs back, flattened the brad, and stuck them on with Soft Gel.

Top on the Left, Bottom on the Right

In case you are unfamiliar with the wonderful properties and myriad uses of Golden gels, mediums and paints, you can learn all about them here: http://www.goldenpaints.com/

The book inside the tin was heavy kraft paper, and I thought about using it as is and sticking various elements and cutouts down on the pages, But I wanted to show off the paper, so I traced around a page to make a template and used that to cut out various papers to cover the kraft pages. For variety, I used the box label as a template and made a few circles with that--like the ones on the top and bottom of the box.
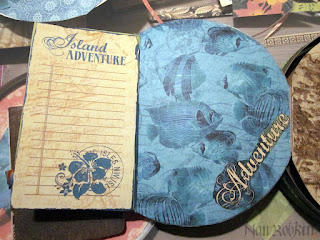
First Page with Attached Flap
I cut out parts of a sheet of paper to make a flap to use as journaling. I envisioned the book as a mini photo album, and so I left room for photos on the pages as I made them. The word came from the same sheet as the flap parts.

Another Page, and the Inside Cover on the Left
I made an accordion book from one of the papers that had images of animals and birds on a background that looked like old book paper. It was a natural--and I covered it with an old book cover pictured on another sheet of paper, and made a spine and back from still other paper. Once I had the little book, I had to do something with it, of course. So I attached it with ribbon. To do this, I determined how much ribbon needed to be stuck down, by tying it around the book and marking where the book edges were. I glued the ribbon down with Soft Gel, and while it was drying I cut out the two circles for the box lining. I made slots in the blue piece to pull the ribbon through, and stuck the paper down with the gel. Then I added the ring of orange paper.

Once I got going, it was just a matter of picking and sticking--that is, choosing which of my page covers to use where, and what to embellish them with. Lots of choices, but my favorite embellishments came from the sheet of faux stamps. Love those!

Another Flap for Journaling
The flaps were stuck down with tape from Scor-It. It is very strong and very thin double sticky, and it has lots of uses, like making washi tape, and receiving glitter. I also used Ranger's new glue stick for some things, especially where I didn't want the wetness of the gel.

The Little Book Open on the Left, and the Cover of the Main Book on the Right.
For the cover of the book, I glued down a circle of paper, and an inner circle on top of that. I had originally gessoed the cover, but didn't like what I did with that, so I just covered it up! Used the Soft Gel for that. I had some metal flowers and brads that I painted with Ranger's new Vintaj Patinas; you can see them here: http://www.rangerink.com/  I cut out the woman's profile and put an orange metal flower with a yellow center in her hair, and stuck her down.

Close Up of Cover Girl
I was running out of paper, so I got out my small stack of Tropical Travelogue and made a few more circles to use inside the tin bottom.

Inside Bottom of Box, Left; Inside Top of Box, Right
If you look hard, you can see another metal flower painted with Vintaj Patina in the box bottom.

Here are the inside pages with the photos added. I downloaded pictures from the internet and sized them all to be two inches for the largest dimension. I used clear photo corners to attach them

Inside the Book, First Three Pages


Pages Three, Four, and Five


Pages Four, Five and Six


For the backs of the pages, I cut strips from scraps of the various papers in Tropical Travelogue and stuck them onto double sticky sheets I had in my stash. Then I stuck them onto the kraft pages. I trimmed everything that needed it.

Backs of Pages and Cover

All that was left to do was add some embellishments to the box lid. I cut out some tags from the papers and tied them to the knob. The orange ribbon was too thick, so I stuck it down with Scor-It tape and put a strip of the faux postage over the ends so they couldn't come loose. You can't see it in any of the pictures, but I stuck some of the orange ribbon to the outside rim of the box top with Scor-It tape; I used lime green ribbon with orange stitching around the outside of the bottom. I also have a tab of the green ribbon embedded in the cover of the book, so it can pull out easily.

Closed Box

This was so much fun to do! I hope it inspires some of Brooke's customers to try it themselves! I had thought of several things to do, like distressing the papers and other cool techniques, but I decided I wanted to keep it as simple as possible. Nothing difficult at all!

Thanks to Brooke, Graphic 45 and Jim, the Gentleman Crafter, who is an inspiration to us all!

And thanks to you, for looking! ---Nan


Wednesday, April 18, 2012

Ah, I heart my Vagabond!

Today I am getting ready to teach a class in Dreamweaver stencils. Find them at http://www.dreamweaverstencils.com/ . Now, those of you who know about stencils, know that trying to deboss some of them by hand is tedious and gets your hand very tired. But if you have a Vagabond (an electric die-cutting machine you can see in action here:  http://sizzixblog.blogspot.com/ ), it's breeze! All you need to do is make a stack of stencil, paper, and soft pad between the cutting plates on your platform, and push a button to run it through.


How easy is that?

Gotta run--almost time to go to class!

Nan

Sunday, April 8, 2012

It Never Rains But It Pours

Things were getting pretty slow in the way of projects and classes to teach, but business has really picked up lately! Got three classes at Bellevue Art and Frame, one at Art Works, and if they all go I will be a hard-working Art Bee. And I have been asked to be on the creative team at Urban Scrapbooker (thanks, Brooke!) and that will be fun too.

Have been languishing with an allergy attack, so I won't be saying much about the book I am posting today. It was made for one of Brooke's contests, and though it didn't win, it was a lot of fun to make. I started with a kit from LYB with acrylic covers, and made extra pages. Most of the regular pages I added were gessoed on both sides before I worked on them.

Outside Cover
The contest kit was made up from Little Yellow Bicycle's Twig collection from last year, papers and embellishments. I carved a couple of stamps for it, and added lots of ribbons.

First Page. The Leaf Ribbon is Hand Dyed to go with the Book Colors
Next Page: It Was Under an Acetate Page
The Rosette Was Made With a Tim Holtz Die; the Birds are Hand Carved Stamps
Love That Translucent Paper
What's Underneath
On the Left It Says "Once You've paid for it, it's free" and on the  Right, "Don't Abandon the Good In Search of the Perfect."
Lots Of Inspirational Words On the Left; "Create" on the Right
There is a Small Notebook on the Left Page; The Right Says "Make a Mark Every Day."
A Tag on the Left; On the Right, "It is the Property of True Genius to Disturb All Settled Ideas," a Quote From Corita
Another Notebook, Left, and a Pocket, Right
When The Green Envelope Is Flipped, the Hands Sort of Hold It
Like This. The Right Page Says :Fear No Art."
The Left Says "Good Stuff," and Has a Pocket; the Right Says "Let Your Ideas Fly Free;" the Bird and Cage are Made With a Tim Holtz Die.
The Page Under the Acrylic Cover
And the Book is Closed
That's all for now! Nan

Sunday, March 25, 2012

Sometimes I Just Get Carried Away

I've been reading a book on how we create--the science behind creativity. It's called Imagine: How Creativity Works, by Jonah Lehrer. (His website is http://www.jonahlehrer.com/ ) I had gotten some hype about the book from a couple of lists I belong to, and I was curious to see what all the fuss is about. Creativity has been on my mind a lot these days; one of my good friends has been bemoaning her lack of it, meanwhile being creative about a problem in her life--she just wasn't making ART and saw that as not being creative. Lehrer's book is a look at how creativity works in the brain, and it is written in a handy accessible narrative style so it makes an enjoyable read as well as an informative one.

I am fond of saying, in accordance with the standard Left-Brain-Right-Brain definition of what in our brain controls what, that I am always in my right mind. Apparently, though, one needs both halves to do any thinking about anything. Throw in the Prefrontal Cortex and you are on your way to being creative, if you just go along with what your brain is doing. But please--don't take my word for it--read the book!

"Cabinet of Curiosities" using stuff from Deviant Scrap

Now my biggest fault in being creative is that there are too many choices pulling at me--should I write a poem? Should I paint something? Collage? Sew? Work on a novel? I am constantly being pulled this way and that, each shiny new thing attracting my attention. Right now I am loving digital art, playing with art journals, making liquid polymer skins, and putting earrings together to sell at the Northwest Polymer Guild's Artisan Gift Show this year. All--or should I say each--of these requires a certain amount of creative thinking, though this kind of decision-making is not earth shaking in its consequences. I don't think I will ever invent Scotch Tape (after all, it's been done) or the Post-it Note, or anything as useful as a Swiffer (all these are talked about in Lehrer's book). I might--though it isn't highly likely--write a poem as game-changing as Bob Dylan's "Rolling Stone," but I only have about twenty-five years or so left to do it, and my Poetic Muse is busy elsewhere right now. What I really have to think about is my upcoming classes and demonstrations, the first of which is next Saturday. So what am I doing? Writing this blog, and posting my digital art to it.

"Woman Escaping Her Stereotype" using Deviant Scrap and other images

These two pieces of digital art are made with the copy of Photoshop CS6 Beta that I downloaded a couple of days ago. I have been a Photoshop user since forever, and am still finding new things to do with it. Some of the new things in CS6 Beta are fun to experiment with. But the old standbys of layers, masks and blending modes are still the big guns in my arsenal. I heart Photoshop! (And that iconic phrase is in Imagine too!)

That's all for now--Nan