http://www.shawnsheehy.com
I warmed up for the workshop by entering another of those contests at Urban Scrapbooking in Edmonds, where you get a kit of papers and embellishments and make whatever you want. Incidentally, my Advent Calendar won the last contest. My only competition was a series of paper dolls, which were really cool, and made me think about my paper doll for this contest. In case you've forgotten what the Advent Calendar looked like, here is a reminder:
The paper dolls in the contest were flat, and made from the kit papers and arranged on a wall hanging. I love paper dolls (and collect those too, in a desultory way), and lately I have been collecting pantin, or jumping jack, patterns. Like the Jumpables I blogged about a couple of posts back, designed by my friend Shirley Rainman.
So I thought I would use one of those and build a costume around it, using the papers in the kit.
 |
| Victorian Pantin |
I chose this one, because the color of her bodice went with the papers in the kit, and I liked her black tights. She didn't come with a body, but those are simple hourglass shapes of the appropriate size, and easy to make even without a pattern.
 |
| Bodies for Pantin Ladies |
These dolls are usually made by pasting materials directly to the assembled doll, but I wanted to make something in three dimensions that would sit on a shelf, That meant I probably needed to make a cone for a skirt. And my cone would be limited by the width of my paper, which was 12 inches. It also would need to be attached to the doll somehow. I worked out a pattern on lightweight chipboard, so I could use it again if I wanted to.
 |
| Cone with Bodice Attached |
I cut the colored paper using the cardboard pattern, and found I had to cut almost to the bottom of the hip on the body to get the cone to form properly. That didn't matter, as those cuts would not show when I executed my Grand Plan for the dress.
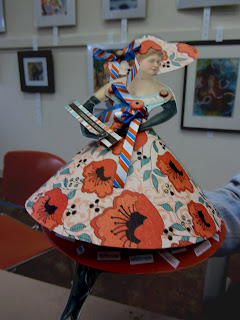
I made a second cone, minus the bodice shape, out of patterned paper, and fit it over the first cone to make an overskirt. Before I closed the cone, I cut a body shape from patterned paper, fastened the legs on with brads, and glued it to the first cone over the attached bodice. Then I put the head and the top of the bodice on top of that. Now I was ready to fit the overskirt on. Next came the arms, attached with brads at the shoulders. I made a ribbon sash to help blend the overskirt to the bodice, and used a brad in the center of the bow for a little pizzaz. The brads were painted with a coppery glitter paint, and went very well with the underskirt and the flowers on the overskirt. I made the doll a matching hat, and used Stickles to add a bit of bling to the skirt and hat. I thought her underskirt needed a little something, so I put word stickers all around the bottom, using words like "adventure" and "explore" and the like. I also added the sign she is carrying, which reads, "I just want to have fun." (Me, too!)
 |
| The Finished Paper Doll |
It was a good warm-up for the next day, when the pop-up adventures began.
Here is a picture of the class, with Shawn Sheehy on the left, in the lime green shirt.
 |
| Pop Up Workshop with Shawn Sheehy |
We worked from 9 AM to 4 PM each day, with an hour for lunch break. We made 16 pop-ups--each one took about an hour--and at the end bound them all into a handy reference book. My book needs a bit of touch up--I want to add titles and such--before I photograph it and post it. But here is a wee preview:
 |
| Pop Ups in Progress |
That's all for now--Nan

Interesting reead
ReplyDelete