So, you can just imagine the elation I felt when my friend Brooke, who owns The Urban Scrapbooker in Edmonds, asked me to be on her Creative Team. I mean, she has the BEST paper! Not to mention all the other good stuff!
So when I said yes, Brooke handed me a couple of projects to get started on. In spite of allergies that turned into pneumonia, I managed to finish one project, A Graphic 45 film box and book. We decided that the Graphic 45 Tropical Travelogue line would be the paper to choose, with suitable embellishments, of course.
You can see the Graphic 45 line here: http://www.g45papers.com/
I started out by gluing a circle of paper to the top and bottom of the film box, using Golden Soft Get as the glue. I fastened a large knobby brad to the center of the top circle before sticking it down. For the bottom, I used four of the smaller knobby brads as feet. I had to think about how I was going to attach them; I could have used a chisel and made a slot, but then I would have had filing and sanding to do. So in the end I clipped the legs back, flattened the brad, and stuck them on with Soft Gel.
 |
| Top on the Left, Bottom on the Right |
In case you are unfamiliar with the wonderful properties and myriad uses of Golden gels, mediums and paints, you can learn all about them here: http://www.goldenpaints.com/
The book inside the tin was heavy kraft paper, and I thought about using it as is and sticking various elements and cutouts down on the pages, But I wanted to show off the paper, so I traced around a page to make a template and used that to cut out various papers to cover the kraft pages. For variety, I used the box label as a template and made a few circles with that--like the ones on the top and bottom of the box.
 |
| First Page with Attached Flap |
 |
| Another Page, and the Inside Cover on the Left |
Once I got going, it was just a matter of picking and sticking--that is, choosing which of my page covers to use where, and what to embellish them with. Lots of choices, but my favorite embellishments came from the sheet of faux stamps. Love those!
 |
| Another Flap for Journaling |
 |
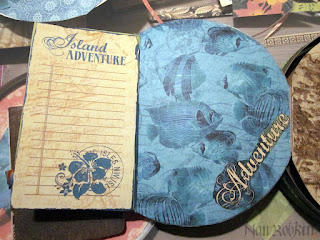
| The Little Book Open on the Left, and the Cover of the Main Book on the Right. |
 |
| Close Up of Cover Girl |
 |
| Inside Bottom of Box, Left; Inside Top of Box, Right |
Here are the inside pages with the photos added. I downloaded pictures from the internet and sized them all to be two inches for the largest dimension. I used clear photo corners to attach them
 |
| Inside the Book, First Three Pages |
 |
| Pages Three, Four, and Five |
 |
| Pages Four, Five and Six |
For the backs of the pages, I cut strips from scraps of the various papers in Tropical Travelogue and stuck them onto double sticky sheets I had in my stash. Then I stuck them onto the kraft pages. I trimmed everything that needed it.
All that was left to do was add some embellishments to the box lid. I cut out some tags from the papers and tied them to the knob. The orange ribbon was too thick, so I stuck it down with Scor-It tape and put a strip of the faux postage over the ends so they couldn't come loose. You can't see it in any of the pictures, but I stuck some of the orange ribbon to the outside rim of the box top with Scor-It tape; I used lime green ribbon with orange stitching around the outside of the bottom. I also have a tab of the green ribbon embedded in the cover of the book, so it can pull out easily.
 |
| Backs of Pages and Cover |
All that was left to do was add some embellishments to the box lid. I cut out some tags from the papers and tied them to the knob. The orange ribbon was too thick, so I stuck it down with Scor-It tape and put a strip of the faux postage over the ends so they couldn't come loose. You can't see it in any of the pictures, but I stuck some of the orange ribbon to the outside rim of the box top with Scor-It tape; I used lime green ribbon with orange stitching around the outside of the bottom. I also have a tab of the green ribbon embedded in the cover of the book, so it can pull out easily.
 |
| Closed Box |
This was so much fun to do! I hope it inspires some of Brooke's customers to try it themselves! I had thought of several things to do, like distressing the papers and other cool techniques, but I decided I wanted to keep it as simple as possible. Nothing difficult at all!
Thanks to Brooke, Graphic 45 and Jim, the Gentleman Crafter, who is an inspiration to us all!
And thanks to you, for looking! ---Nan


